In Azure land, there’s many resources for many reasons. Throughout the cloud security part of my career, I’ve seen environments use many different types of resources but the most common one I’ve seen, by far, are storage accounts. Storage accounts are used sometimes without the customer even knowing it. Ever spin up Cloud Shell? There’s probably a storage account. Ever use Diagnostic Settings? There’s probably another storage account for that. Many of the resources in Azure depend on storage accounts and blob storage for hosting things like metadata, session info, or event data. Then there’s the practical use for them such as storing intellectual property, file backups, etc. Regardless of the reason, it’s probably a good idea to secure that data in some way, both from the authorization & authentication level but also from the detection side. The goal of this post is to highlight a few attacks and how to detect or defend against them.
Storage Account Architecture
Before jumping into the “how”, let’s go over the “what”. Storage accounts are containers that have different hosting options. These are broken down into four main categories:
- Blob storage
- Azure Files
- Tables
- Queues
For the purpose of this post, we’ll focus on blob storage and Azure Files.
Blob storage is comprised of containers which each have individual access control policies in the form of RBAC (IAM), ACLs (if SFTP is used), SAS tokens, and access policies (which apply to the SAS tokens). Blob storage can be public or private as well.
Azure Files is an SMB/NFS file share service which is meant to be used as a cloud-based file share system where you can mount and upload files. It also supports SAS for REST-based access (share/file SAS), and SMB access via account key (NTLMv2). There is IAM, as well as identity source authentication such as Active Directory Domain Services, Entra Domain Services, and Entra Kerberos.
Keep in mind that these “attacks” are really just abuse of features and their configurations. If you’re an experience cloud architect you will probably roll your eyes at some of these, but if my experience in security can be summarized, it’s abusing common things admins forget about. Don’t lie to us, back when you were a system admin, you didn’t enforce SMB signing either.
Common Blob Storage Attacks
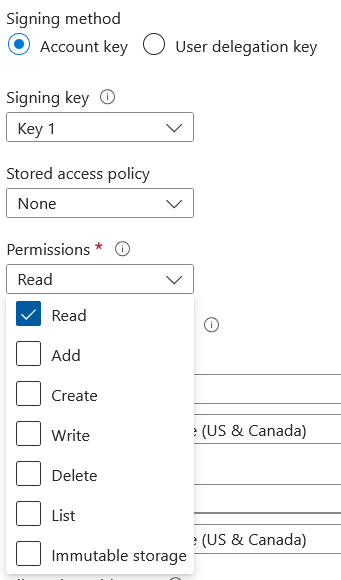
One method of accessing a blob storage container is by using a Shared Access Signature (SAS) token. The token itself looks something like this:
sp=r&st=2025-12-13T02:49:03Z&se=2025-12-13T11:04:03Z&spr=https&sv=2024-11-04&sr=b&sig=nVGDCpS3WYbMyezOqQzMvXHCSAfuFatr%2BogO7u65k2pY%3D

Which is appended to a URI:https://hausectestsa.blob.core.windows.net/testcontainer/1.ps1?sp=r&st=2025-12-13T02:49:03Z&se=2025-12-13T11:04:03Z&spr=https&sv=2024-11-04&sr=b&sig=nVGDCpS3WYbMyezOqQzMvXHCSAfuFatr%2BogO7u65k2pY%3DThis method of retrieving or uploading data to a container is still extremely common in pipelines and something that I’ve found on several engagements just floating out in a GitHub build or repo. There’s two types of SAS tokens:
- User Delegation – uses the user’s permission of who generated the token
- Account key – uses the access key of the storage account
Account keys are basically the god key of the storage account and can also be used for authentication. If this is used to sign the SAS token, then the entire contents can be considered compromised if the token was crafted to allow read access. Tokens can be scoped to several permissions.
This is especially important to note because SAS tokens are often used for persistence as well. SAS tokens are not:
- Subject to password strengths
- Conditional access policies
- Subject to just-in-time or privileged identity management
- Can be almost indefinite
- Can have complete access to a container
Luckily, there’s several things that can be done to secure SAS tokens. The first and most obvious is to not use them. With the introduction of Managed Identities, using SAS tokens for container operations is ill-advised. If you’re insistent on using them, it’s heavily recommended to use user delegation keys over account keys for more granular control in addition to restricting them to certain IP addresses with expiration dates that aren’t 200 years in the future.
On the detection side, detecting SAS usage isn’t as straightforward as you’d think.
Detecting the generation of both versions of the SAS token requires Diagnostic Settings on the blob to be enabled. The user delegation key has a straightforward operation name value of GetUserDelegationKey, but the account key method does not. From my research, this behavior is not documented, but my assumption is that because your credentials as an EntraID user are used to generate the delegation key. So in order to detect account key signed SAS tokens, you have to rely on the signature itself. A signature for a user delegation key looks like this
sp=r&st=2025-12-14T04:21:25Z&se=2025-12-14T12:36:25Z&skoid=d4e6d6ab-1234-4435-bfc6-3fb11de1bffc&sktid=123456789-b4ec-434a-857e-8d0628d4c1e5&skt=2025-12-14T04:21:25Z&ske=2025-12-14T12:36:25Z&sks=b&skv=2024-11-04&spr=https&sv=2024-11-04&sr=b&sig=1G0V%2BeKHpYaJrh0xp9Km4%2FgYZUnKFE34Xnr8uyhsMJ0%3Dand an account key looks like this
sp=r&st=2025-12-14T04:21:25Z&se=2025-12-14T12:36:25Z&spr=https&sv=2024-11-04&sr=b&sig=FQJ5lyBlI9ss7qT58X3hxLV0SNq8yuDFYsSerKLDU68%3Dthe difference is the skoid field, which specifies the object ID for a Microsoft Entra security principal. Since an account key doesn’t have an object ID, this field will not be present in events where an account key signed SAS is used to retrieve a blob object. In KQL, a query to see all account key SAS token transactions looks like this:
StorageBlobLogs
| where OperationName == 'GetBlob'
| where AuthenticationType == "SAS"
| where not(Uri has "skoid")
The next common (maybe less common) attack is using object replication rules to copy blobs or containers from one tenant to another. I specifically want to highlight a limitation of the portal here, which at a glance, limits you to the subscriptions in your tenant.

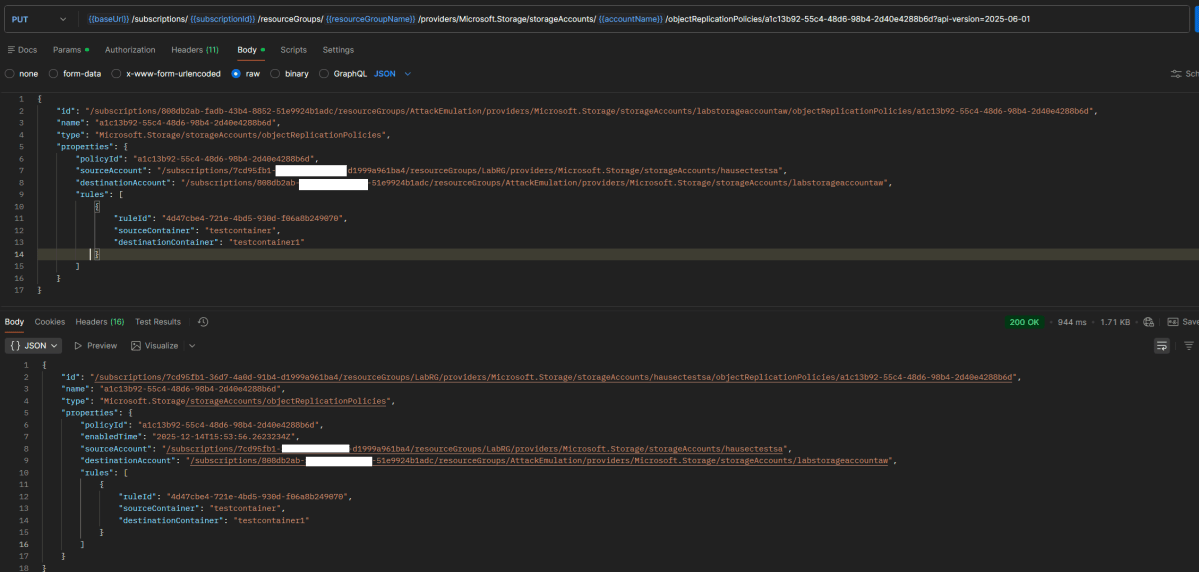
However, with the introduction of cross-tenant replication (which was enabled by default if the storage account was created before Dec.15 2023) you can replicate across tenants through using the REST API method objectReplicationPolicies or by uploading a similar JSON to the replication rules part of the portal. For demonstration purposes, I’ll use the REST API. First is to create the policy on the destination (i.e. attacker controlled) storage account with the policyId of “default”, but the source set to the storage account you want to replicate from.
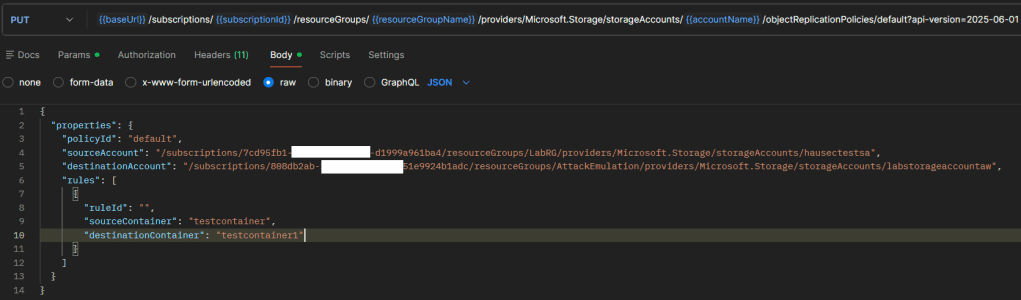
Now copy the response and send it as the request using the same API method but to the source (i.e. victim) storage account. For clarity, between these two screenshots the JWT and variables were re-scoped from the destination tenant to the source storage accounts tenant.

We can now see on the victim/source storage account that the replication rule exists.

The major concern with this attack is that the logging is poor. Since the details of the policy being cross-tenant or same-tenant live within the properties of the request/JSON file, these don’t make it to the event logs. If you’re not expecting any replication policies then of course you can just alert on a replication policy being created:
AzureActivity
| where OperationNameValue == 'MICROSOFT.STORAGE/STORAGEACCOUNTS/OBJECTREPLICATIONPOLICIES/WRITE'
| where ActivityStatusValue == 'Success'
But if you specifically want to alert on cross-tenant policies you’re out of luck. Since replication is done via SAS, activity looks the same whether the blob is being copied to the same tenant or a different one. Even when inspecting the rule in the portal, nothing indicates that the policy is ‘cross-tenant’.

You have to download the rule or inspect it with the REST API to see the destination storage account is in another subscription, but even then there’s still no identifier for another tenant. This is why the policy has to be created on the destination first, so that the policy ID number is used as the identifier for Azure to make the connection across tenants. In my opinion, the logging is very poor and the optics overall are not user friendly, making this an ideal way of extracting data in a storage account continuously. In terms of operations, this is a query that will return anytime a storage account is switched to allow cross-tenant replication and then subsequently have a new policy created.
let TimeWindow = 50m;
let CrossTenantEnabled = AzureActivity
| where TimeGenerated > ago(24h) // Adjust lookback as needed
| extend req = todynamic(tostring(Properties_d.requestbody))
| where tobool(req.properties.allowCrossTenantReplication) == true
| project TimeEnabled = TimeGenerated, ResourceId, Caller, CorrelationId, EnableOperationName = OperationNameValue;

let ReplicationPolicyWrite = AzureActivity
| where TimeGenerated > ago(24h) // Adjust lookback as needed
| where OperationNameValue == 'MICROSOFT.STORAGE/STORAGEACCOUNTS/OBJECTREPLICATIONPOLICIES/WRITE'
| where ActivityStatusValue == 'Success'
| project TimePolicy = TimeGenerated, ResourceId, PolicyCaller = Caller, PolicyCorrelationId = CorrelationId, PolicyOperationName = OperationNameValue;

CrossTenantEnabled
| join kind=inner (ReplicationPolicyWrite) on ResourceId
| where abs(TimeEnabled - TimePolicy) <= TimeWindow
| project-away ResourceId1 // Clean up duplicate columns from join
Continuing on from specific attacks, detecting malicious use of trivial things like downloading and uploading blobs can be very challenging in large environments because of the volume. Things like strict IAM policies, disabling SAS authentication, and enabling backups are great, but there’s always the question of “what if someone who already has access gets compromised?“. There’s some interesting things we can do with detections to try and weed out normal activity and detect anomalous behavior. Being in detection engineering one thing I realized is that if an architect can make their environment operate consistently, or without a lot of variability, the easier it is to detect malicious behavior.
Consider the following scenario. You have a service/application/program that is continuously uploading and downloading data from a container which entire purpose it to house the data for this service and nothing else. This service was coded in python and uses the Azure python SDK. While the volume of the transactions in the container is high, the surrounding properties are consistent. This allows detection engineers to form extremely narrow detections around things like user agent strings.
StorageBlobLogs
| where AccountName == 'OurSecretsLiveHere'
| where OperationName has_any ("GetBlob", "PutBlob")
| where UserAgentHeader !has "python-sdk"
This thought process can be expanded upon as well. For example, if there’s a storage account that several regular users access, you can baseline their activity to alert when it’s anomalous based on things like their UserAgentHeader, TrustedAccessSas, or ReferrerHeader. This detection will baseline each user’s user agent string over the last 15 days then compare it to events in the last hour, returning any users who has a new UAS.
let BaselineWindow = 15d;
let DetectWindow   = 1h;

let BaselineStart = ago(BaselineWindow + DetectWindow);
let BaselineEnd   = ago(DetectWindow);
let DetectStart   = ago(DetectWindow);

let BlobOps = dynamic([
  "GetBlob", "GetBlobProperties", "GetBlobMetadata",
  "PutBlob", "PutBlock", "PutBlockList", "AppendBlock", "PutPage"
]);

let Normalize =
    (T:(TimeGenerated:datetime, OperationName:string, Uri:string, UserAgentHeader:string, RequesterUpn:string, CallerIpAddress:string)) {
      T
      | where OperationName in~ (BlobOps)
      | extend Path = tostring(parse_url(Uri).Path)
      | extend Container = tostring(split(Path, "/")[1])
      | extend User = coalesce(RequesterUpn, "unknown")
      | extend UA = tolower(tostring(UserAgentHeader))
      | where isnotempty(Container) and isnotempty(User) and isnotempty(UA)
    };

let Baseline =
    StorageBlobLogs
    | where TimeGenerated between (BaselineStart .. BaselineEnd)
    | invoke Normalize()
    | summarize BaselineUAs = make_set(UA, 512), BaselineEvents = count() by User, Container;

let Current =
    StorageBlobLogs
    | where TimeGenerated >= DetectStart
    | invoke Normalize()
    | summarize
        CurrentUAs = make_set(UA, 512),
        CurrentEvents = count(),
        LastSeen = max(TimeGenerated),
        SampleIP = any(CallerIpAddress)
      by User, Container;

Current
| join kind=leftouter Baseline on User, Container
| extend BaselineUAs = coalesce(BaselineUAs, dynamic([]))
| extend NewUAs = set_difference(CurrentUAs, BaselineUAs)
| where array_length(NewUAs) > 0
| mv-expand NewUAs
| project
    LastSeen,
    User,
    Container,
    NewUserAgent = tostring(NewUAs),
    SampleIP,
    CurrentEvents,
    BaselineEvents,
    BaselineUAs
| order by LastSeen desc
To take it even one step further, we can baseline based on the amount of transactions a user does over a day. By combining AzureMetrics with StorageBlobLogs, this query will return anytime a container has a 20% increase of activity and will try to attribute which user is causing it.
let BaselineDays = 15d;
let MinTxPerDay  = 5;
let IncreasePct  = 0.20;
let Today = startofday(now());
let BaselineStart = Today - BaselineDays;

let EgressMetric = "Egress";
let TxMetric     = "Transactions";

let DailyEgress =
AzureMetrics
| where TimeGenerated >= BaselineStart
| where MetricName == EgressMetric
| extend ResId = tolower(coalesce(tostring(column_ifexists("ResourceId","")),
                                 tostring(column_ifexists("_ResourceId",""))))
| summarize EgressBytes = sum(Total) by Day = startofday(TimeGenerated), ResId;

let DailyTx =
AzureMetrics
| where TimeGenerated >= BaselineStart
| where MetricName == TxMetric
| extend ResId = tolower(coalesce(tostring(column_ifexists("ResourceId","")),
                                 tostring(column_ifexists("_ResourceId",""))))
| summarize TxCount = sum(Total) by Day = startofday(TimeGenerated), ResId;

let Daily = DailyEgress | join kind=inner DailyTx on Day, ResId;

let Baseline =
Daily
| where Day between (BaselineStart .. Today - 1d)
| where TxCount >= MinTxPerDay
| summarize BaselineAvgBytes = avg(EgressBytes), BaselineDays=count() by ResId;

let Spikes =
Daily
| where Day == Today
| where TxCount >= MinTxPerDay
| project ResId, Day, CurrentBytes=EgressBytes, CurrentTx=TxCount
| join kind=inner Baseline on ResId
| extend ThresholdBytes = BaselineAvgBytes * (1.0 + IncreasePct)
| where CurrentBytes > ThresholdBytes
| project ResId, Day, CurrentTx, CurrentBytes, ThresholdBytes, BaselineAvgBytes, BaselineDays;

let BlobOps = dynamic(["GetBlob","GetBlobProperties","GetBlobMetadata","PutBlob","PutBlock","PutBlockList","AppendBlock","PutPage"]);

Spikes
| join kind=inner (
    StorageBlobLogs
    | where TimeGenerated between (Today .. Today + 1d)
    | where OperationName in~ (BlobOps)
    | extend ResId = tolower(coalesce(tostring(column_ifexists("ResourceId","")),
                                     tostring(column_ifexists("_ResourceId","")),
                                     tostring(column_ifexists("Resource",""))))
    | extend Bytes = tolong(coalesce(
        column_ifexists("ResponseBodySize", long(null)),
        column_ifexists("ResponseSize", long(null)),
        column_ifexists("TotalBilledSize", long(null)),
        0
      ))
    | extend Path = tostring(parse_url(Uri).Path)
    | extend Container = tostring(split(Path, "/")[1])
    | extend User = coalesce(
        tostring(column_ifexists("RequesterUpn", "")),
        tostring(column_ifexists("AuthenticationIdentity", "")),
        tostring(column_ifexists("RequesterObjectId", "")),
        "unknown"
      )
    | extend UA = tostring(column_ifexists("UserAgentHeader", ""))
    | extend IP = tostring(column_ifexists("CallerIpAddress", ""))
    | project TimeGenerated, ResId, OperationName, Container, User, IP, UA, Bytes
) on ResId
| summarize
    Events = count(),
    TotalBytes = sum(Bytes),
    UAs = make_set(UA, 50),
    IPs = make_set(IP, 50),
    FirstSeen = min(TimeGenerated),
    LastSeen = max(TimeGenerated)
  by Day, ResId, Container, User, CurrentTx, CurrentBytes, ThresholdBytes, BaselineAvgBytes, BaselineDays
| order by TotalBytes desc
Detecting Anomalous Azure Files Downloads
As mentioned earlier, Azure Files also supports authentication with the storage account key, which acts as a password when mounting the share. This means any operations over SMB will not have a username or any identifier for the actual user performing the operation.

If you are using identity-based connections, such as AD DS, then there are user identifiers. For AD DS, it’s the user’s SID.

Similar to the previous detection, this allows baselining based on an identity’s transactions. This becomes a bit cleaner since SMB activity includes the bytes.
let BaselineDays   = 30d;
let IncreasePct    = 0.50;   // 50%
let MinDailyEvents = 5;      // only alert if user did at least this many Reads today
let Today = startofday(now());
let BaselineStart = Today - BaselineDays;

let Daily =
StorageFileLogs
| where TimeGenerated >= BaselineStart
| where OperationName == "Read"
| where isnotempty(SmbPrimarySID)   // ignore if no SID
| extend Day = startofday(TimeGenerated)
| extend Bytes = tolong(ResponseBodySize)
| where isnotnull(Bytes) and Bytes >= 0
| summarize DailyBytes = sum(Bytes), DailyEvents = count() by SmbPrimarySID, Day;

let Baseline =
Daily
| where Day between (BaselineStart .. Today - 1d)
| summarize
    BaselineAvgBytes = avg(todouble(DailyBytes)),
    BaselineDaysSeen = count(),
    BaselineAvgEvents = avg(todouble(DailyEvents))
  by SmbPrimarySID;

let Current =
Daily
| where Day == Today
| where DailyEvents >= MinDailyEvents
| project SmbPrimarySID, CurrentBytes = DailyBytes, CurrentEvents = DailyEvents;

Current
| join kind=inner Baseline on SmbPrimarySID
| extend ThresholdBytes = BaselineAvgBytes * (1.0 + IncreasePct)
| where todouble(CurrentBytes) > ThresholdBytes
| project
    TimeWindowStart = Today,
    SmbPrimarySID,
    CurrentEvents,
    CurrentBytes,
    ThresholdBytes,
    BaselineAvgBytes,
    BaselineDaysSeen,
    BaselineAvgEvents
| order by CurrentBytes desc
With Azure Files being a cloud-hosted file share service (SMB/NFS), there’s not many unique attacks outside the obvious “mount and download”. I still see storage accounts biggest risk being alternate authorization paths (shared key, SAS sprawl) and quiet data movement features (like object replication) that often bypass the controls people rely on for Entra identities.
If you’re scrolled to the very bottom and want the TL;DR: (1) prefer Entra/OAuth via managed identities over SAS wherever possible, (2) disable cross-tenant replication unless you have a business requirement, and (3) build detections around configuration drift plus stable client fingerprints (user agents, IPs, expected operations). Your environment becomes dramatically easier to defend when you reduce the degrees of freedom adversaries can abuse.