
Using the “Intense Scan, all TCP ports” option in Zenmap, several ports are shown open.
Looking at the output of the scan, shows that there’s a possible mountable share. 

Before mounting that, I went to enumerate some of the other services first.
Using this script here, it allowed me to enumerate users via the finger service. Aside from the typical list of users that are default, I found three additional ones: Vulnix, User, & Dovecot.

As a note, for all CTF VMs, I always take the name and put the name of the machine in the wordlists, whether it’s for passwords or usernames. It’s a common theme to have either of those be the name of the VM.
I then went on to mount the share I discovered before to my machine
mount 192.168.218.133:/home/vulnix /mnt/tmp -nolockHowever when trying to get to that share, it says permission denied
A quick Google reveals something called root squashing. So now my goal was to get into the machine another way and disable root squashing to be able to get into that share.
After spending more time than I should’ve enumerating other services and trying exploits, I decided to try and bruteforce my way into ssh, using the wordlist “big.txt” and the username “vulnix” and “user”.
hydra -L users.txt -P big.txt 192.168.218.133 ssh
After awhile, it finally comes back with the credentials user:letmein

Next was to do some enumeration.
gcc wasn’t a thing for this user so no compiling exploits, so next was to try and work around the limitations of the mounted share that I mounted earlier. To do this you have to get the UID of the user that owns the share, which in this case is vulnix.
To get the UID, I typed
cat /etc/passwd
and the user’s IDs are listed.
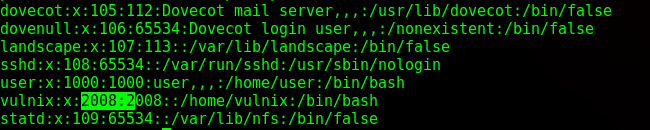
Vulnix UID is 2008, so I make a user on my machine named Vulnix with the UID of 2008.
useradd vulnix -u 2008
I switch to vulnix and try to access the share

I now see my way in: via SSH key.
I make a directory called .ssh, cd into it and make another file called authorized_keys.

After those are made, I go back to root on my machine and generate an RSA key.
ssh-keygen
I just hit enter all the way through the prompts and then read the ssh key:
cat /root/.ssh/id_rsa.pub
I then copy the full key to new file called id_rsa.pub and save it on the root of my machine, so user vulnix can access it.
I switch back to vulnix and copy the key into the .ssh folder I made on the mounted share.
cp ida_rsa.pub /mnt/tmp/.ssh/authorized_keys

Confirming it’s there

I then tried to login via the command
ssh vulnix@192.168.218.133
However I kept getting the error:
sign_and_send_pubkey: signing failed: agent refused operation
After some Google-ing, the commands
eval `ssh-agent -s`
ssh-add
worked and I was then able to login. Checking the sudo permissions was my next step
Since I was now able to edit /etc/exports, I could go in and turn off root squashing via the command
sudoedit /etc/exports

The last line:
*(rw,root_squash)
was changed to
*(rw,no_root_squash)
I then pressed ctrl+X to write the changes and then for the change to take effect, the machine has to be rebooted.
After reboot, I have to remount the mountable partition again.

and I’m in. Next was to copy /bin/bash from MY machine while I’m logged in as root, so /bin/bash is executed as root, to the mounted share so that I could log back in as Vulnix and run /bin/bash that has root permissions. I also had to made the binary executable by anyone.

Logging back in over ssh as Vulnix, I then executed the binary which granted me a root shell.
